 |
Step 4: ATTACHING THE DECODER
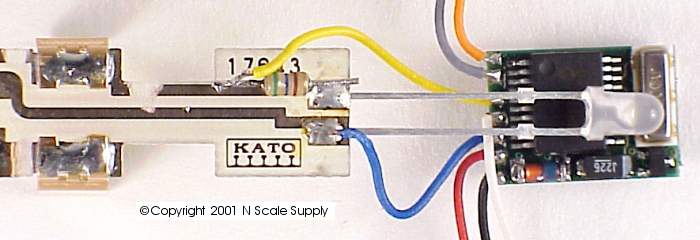
- Starting at the rear of the board attach each of seven wires from the decoder. Solder the BLUE wire to the same pad as the LED attaches to. This should be on the trace that runs the entire length of the board to the front LED.
- Attach one end of the shortest 560 ohm resistor to the other leg of the LED. This resisitor is going to rest on the circuit board, one end attached to the solder pad, the other floating in space.
|
 |
- Attach the YELLOW wire to the opposite end of the 560 ohm resisitor. Make sure that the joint is NOT touching the circuit board. If you are worried about this place a small piece of heat shrink over the end, I have not done this and have not had any problems.
|
 |
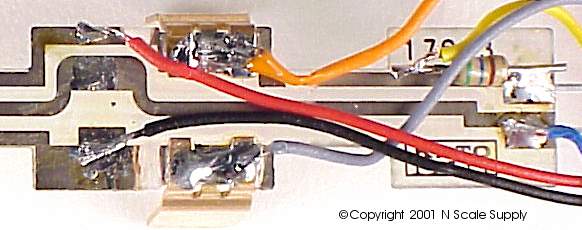
- Attach the ORANGE wire to the motor tab on the right hand side (from the engineers perspective) of the board.
- Attach the GRAY wire to the motor tab on the left hand side of the board.
- Attach the RED wire to the trace just ahead of the right motor tab
- Attach the BLACK wire to the trace just ahead of the left motor tab
|
 |
- Take the remaining 560 ohm resisitor, attach the short end to the right leg of the LED at the solder pad. Again leave the other end floating in the air.
- Place the 3/8" piece of Heat Shrink over the WHITE wire and slide it towards the decoder to get it out of the way. Attach the WHITE wire to the free end of the 560 ohm resisitor. Make sure the connection is not touching the circuit board. Slide the piece of Heat Shrink over the joint. The tubing I have used makes a very snug fit over the end of the resisitor and I have not found shrinking it necessary.
- Assuming your connections are all good you can unplug the soldering iron. Carefully check the board to make sure all traces are cut through completely. Scratch the fiberglas with the tip of a sharp knife and you should see white. Make sure all solder connections are solid and shiny. Make sure nothing is touching anything it shouldn't be. Set the board aside for a few minutes. Your engine will be running in about five more minutes.
|